Introduction
Sewing is a timeless craft that marries creativity with functionality. From mending a tear to crafting an entire garment, sewing opens up a world of possibilities for self-expression, sustainability, and skill-building. Whether you’re a complete beginner or brushing up on your knowledge, understanding the basic techniques is essential for building a strong foundation in sewing. This guide will take you through the essential tools, techniques, and tips to help you begin your sewing journey with confidence.
- Getting Started: Essential Sewing Tools
Before you begin sewing, it’s important to gather the right tools. Here are the must-haves for any beginner:
Hand Sewing Tools
- Needles: Choose sharp needles suitable for your fabric weight (lightweight fabrics require finer needles).
- Thread: Polyester thread is versatile for beginners; match the color to your fabric.
- Thimble: Protects your finger while hand stitching.
- Pins and Pincushion: Essential for holding fabric in place before sewing.
- Scissors: Fabric scissors for cutting fabric only, and small snips for trimming threads.
Machine Sewing Tools
- Sewing Machine: A basic model with straight stitch, zigzag, and backstitch functions is ideal for beginners.
- Bobbins: These hold the bottom thread in your machine.
- Seam Ripper: For removing stitches or fixing mistakes.
- Measuring Tape: For accurate measurements.
- Iron and Ironing Board: Pressing fabric improves sewing accuracy and final appearance.
- Understanding Fabric and Grain
Before sewing, it’s crucial to understand the types of fabric and how they behave.
Fabric Types
- Woven Fabrics: These include cotton, linen, and denim. They’re stable and don’t stretch much, making them perfect for beginners.
- Knit Fabrics: Stretchy fabrics like jersey and spandex require different needles and stitches.
- Non-woven Fabrics: Felt and interfacing fall under this category.
Grain Lines
- Lengthwise Grain: Runs parallel to the selvage and provides the most stability.
- Crosswise Grain: Runs perpendicular to the selvage and has slight stretch.
- Bias Grain: Diagonal to the grain, offers the most stretch and drape. Bias cuts are used for curves or fitted garments.
- Hand Sewing Techniques
Although sewing machines are common, hand sewing is still important for details, repairs, and finishings.
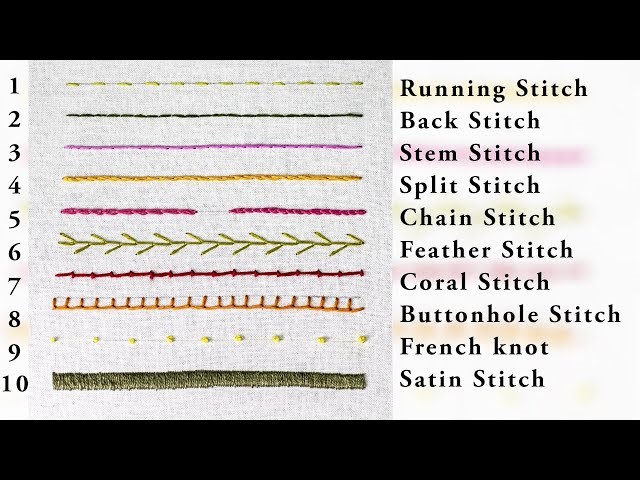
Basic Hand Stitches
- Running Stitch: A simple in-and-out stitch for temporary seams and gathering.
- Backstitch: Strong and secure, perfect for seams that need durability.
- Slip Stitch (or Ladder Stitch): Invisible when done correctly, ideal for hemming or closing seams.
- Whipstitch: Great for joining two pieces of fabric or finishing raw edges.
Tips for Hand Sewing
- Use short lengths of thread (around 18 inches) to avoid tangling.
- Always knot your thread at the start and end.
- Maintain even tension and stitch length for a neater appearance.
- Sewing Machine Basics
Learning to use a sewing machine properly will speed up your sewing and give more professional results.
Getting to Know Your Machine
- Threading the Machine: Follow the manual carefully. Incorrect threading can lead to skipped stitches or jams.
- Winding the Bobbin: Load the bottom thread spool by following machine-specific instructions.
- Tension Control: Ensures even stitches. Too tight or too loose tension affects stitch quality.
- Presser Foot: Holds the fabric in place. Different feet are available for zippers, buttonholes, and more.
Basic Stitches on a Sewing Machine
- Straight Stitch: The most common and versatile stitch.
- Zigzag Stitch: Good for stretchy fabrics and finishing edges.
- Backstitch: Reinforces the start and end of a seam.
- Stretch Stitch: Useful for knits and flexible garments.
- Common Sewing Seams
Seams are the building blocks of sewing projects, holding fabric pieces together.
Types of Seams
- Plain Seam: The standard seam, sewn with right sides together and pressed open.
- French Seam: Encases raw edges; perfect for delicate or sheer fabrics.
- Flat-Felled Seam: Strong and tidy, ideal for jeans and shirts.
- Overlocked Seam: Done with a serger or overlock machine, finishing edges and sewing in one step.
Pressing Seams
Always press seams during sewing. This flattens stitches and helps fabric hold its shape. Press, don’t iron—lift and press with the iron rather than dragging it.
- Hems and Finishes
Finishing your project properly adds durability and style.
Basic Hemming Techniques
- Double Fold Hem: Fold fabric edge under twice and sew, used for garments and curtains.
- Blind Hem: Nearly invisible from the front, great for dress trousers and skirts.
- Rolled Hem: Narrow and neat, used for scarves and lightweight fabrics.
Edge Finishing Techniques
- Pinking Shears: Prevent fraying by cutting fabric with a zigzag edge.
- Zigzag Stitch or Overlock: Clean and durable edge finishing.
- Bias Tape: Used to encase raw edges neatly, especially on curved seams.
- Sewing Corners, Curves, and Notches
Sewing isn’t always straight lines. Learning to handle complex shapes is essential.
Sewing Corners
- Mark the pivot point.
- Sew to the mark, leave the needle in the fabric, lift the presser foot, pivot the fabric, then continue.
Sewing Curves
- Go slowly and pivot frequently.
- Clip the seam allowance on inward curves and notch on outward curves for smoother shapes.
Notching and Clipping
- Clip: Small cuts into the seam allowance for inward curves.
- Notch: V-shaped cuts for reducing bulk on outward curves.
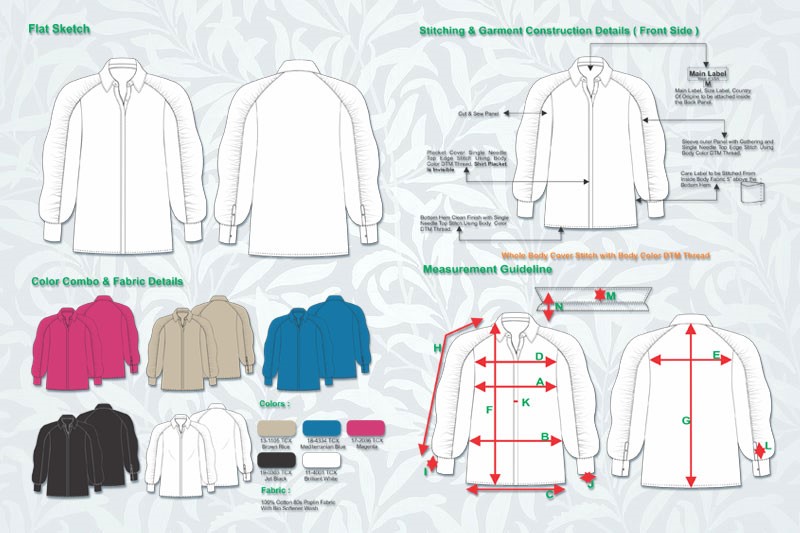
- Basic Garment Construction
Once you’re confident with seams and stitches, try your hand at making simple garments.
Pattern Reading
- Understand symbols: grain lines, notches, darts, fold lines.
- Cut out patterns and fabric pieces carefully.
- Transfer all markings (with tailor’s chalk or washable markers).
Order of Assembly
- Construct main body pieces first (e.g., bodice, skirt).
- Sew darts or pleats if included.
- Attach facings, collars, sleeves, or linings as required.
- Finish hems and apply fasteners like zippers or buttons last.
- Fasteners and Closures
These details hold garments together and add style.
Buttons and Buttonholes
- Use buttonhole foot on sewing machine.
- Sew buttons securely by hand or machine.
Zippers
- Install using a zipper foot.
- Options include invisible zippers, lapped zippers, and exposed zippers.
Hooks, Eyes, and Snaps
- Useful for small closures on lingerie, dresses, or waistbands.
- Troubleshooting Sewing Problems
Even experienced sewers run into issues. Here are common problems and quick fixes:
| Problem | Cause | Solution |
| Skipped Stitches | Dull needle or incorrect threading | Change needle and rethread |
| Thread Bunching | Incorrect bobbin tension or threading | Rethread both top and bobbin threads |
| Fabric Not Moving | Feed dogs down or presser foot up | Check settings, lower foot |
| Uneven Stitches | Tension too tight or too loose | Adjust tension dial |